Categories

How To Remove Error Deleting File or Folder-tricks

Sunday 18 June 2017
0 comments
http://www.bleepstatic.com/tutorials/delete_in_use_files/file_is_in_use.jpg
How To Remove “Error Deleting File or Folder”

It is a very common and annoying message that the file or folder you are trying to deleted cannot be deleted or thependrive cannot be removed as it is used by the system.In this tutorial I will show how to remove your pendrive or delete the files and folders if you get such an error.This error has various flavours and it can be of any of the following types:
  • Cannot delete file: Access is denied
  • There has been a sharing violation.
  • The source or destination file may be in use.
  • The file is in use by another program or user.
  • Make sure the disk is not full or write-protected and that the file is not currently in use.
http://t3.gstatic.com/images?q=tbn:oSOvCxp4HPkJqM:http://i212.photobucket.com/albums/cc94/Dl4All/album2/Unlocker.png&t=1
 1. Download and Install Unlocker.
Click Here To Download(837 kb)

2. Right click on the pendrive or file or folder that has to be removed or deleted.
http://t3.gstatic.com/images?q=tbn:Sl8fot38Gc2QzM:http://img214.imageshack.us/img214/377/tutorial1aj.png&t=1
 3. Now, Click on the Unlocker

4. Now it will show all the processes that are using the file or folder or Pendrive.
http://t1.gstatic.com/images?q=tbn:-jPtAIRgV7TF5M:http://img168.imageshack.us/img168/4140/tutorial2f.png&t=1 
5. Click on the Unlock All and you are done.Now you can delete the file or folder or remove the pendrive.


Read more »

How to fix corrupted files in XP

0 comments
http://i37.tinypic.com/fe2o29.png

How to fix corrupted files in XP How to fix corrupted files in XP // Introduction // This tutorial has been made so people that are having problems with corrupted files, can learn how to fix them easy. // Required // + Windows XP operating system + Windows XP cd // Right to the tutorial // + Place the xp cd in your cd/dvd drive + Go to start + run + type in ’sfc /scannow’ (without the ‘) Now it should all load, and fix all your corrupted file on windows XP


http://www.howtogeek.com/wp-content/uploads/2007/06/er_thumb.png

How to Add Horizontal Lines in Word 2007 Document Quickly 
How to Add Horizontal Lines in Word 2007 Document Quickly ? You can add horizontal lines in Word 2007 document quickly without having to use the ribbon on the top of the page. A very easy way to add horizontal lines in Word 2007 quickly is by using the keyboard shortcuts. This method will save your time. You will be able to insert lines of many different designs by using the keyboard and not having to use the mouse at all. In order to add horizontal lines in Word 2007 document quickly, you can use one of the following procedures: 1. If you want to add a simple straight line, type three dashes (—) and press Enter on the keyboard. 2. For this style of a horizontal line, type three asterisks (***) and press Enter. 3. Type three underscores ( ___ ) and press Enter to get this line: 4. Type three equal signs (===) and hit Enter to get this line. 5. Three pound signs ( ### ) and press Enter for this style of line: 6. Typing in three tildes ( ~~~ ) and hitting Enter will allow you to add this horizontal line: You can add horizontal lines in Word 2007 document quickly by using these shortcuts to break two paragraphs, to mark the end of a document or to break the numerous sections of a document. By simply using a new character such as an asterisk or a pound sign, you can add style to the Word document.
http://main.makeuseoflimited.netdna-cdn.com/wp-content/uploads/2008/11/system-preference.png

How to Share a Folder in Windows Systems
How to Share a Folder in Windows Systems If you have a home network or inside a corporate network, you can share your files with other computers in your house or share office documents with your co-workers. Having a shared folder is convenient for file exchange. You don’t need to bring a blank CD or a flash drive to another computer to copy the files you need and bring back to your computer. In order for you to set up a shared folder, you need to have a home workgoup network setup or under the same domain inside a corporate. You can follow these steps to setup a sharing folder. Step 1 Create a new folder, you can place inside the C drive, or you can put in on your desktop or inside your “My Documents” folder. Step 2 Now select the folder and right click on it, choose “Properties”. The folder properties window opens up. Step 3 On the top of the window, click on “Sharing” tab. And select the radio button “Share this folder”. Then enter a name for the share name. Step 4 On the same window, click on “Permission” and the permission window will come up. The default group or user names is Everyone, of course you can add or remove another group or user by clicking the “Add” and “Remove” buttons. Step 5 In the permissions box, give proper permissions to each group or user: “Read” means to grant the user to read only, while “Change” grant to edit and “Full Control” means you grant access to read, edit and delete files within the shared folder. Step 6 Now to test your work: from Start, click on Run, enter the network path to the folder, normally looks like this: pcnamesharedfoldername


Read more »

►Trick To Make Computer Speak Whatever You Type

0 comments
http://t3.gstatic.com/images?q=tbn:ANd9GcQ6tzREaibqcaLYXqsEh_oNVHKk6ubDAn6A9oSQrdJiv-CULe52

This is an amazing trick to amaze your friends.By using this trick you can make your computer to speak whatever you type.This trick is working on all microsoft operating system and does not require any programming skills.You have to follow just simple steps and your own Text to Voice software will be ready.If you show this software to any of your friends he will be certainly impressed with you . Ok,the trick is fairly simple and requires only 3 simple steps from your side.Let’s Begin 1.Open Notepad and copy and paste the following code into it Dim message, sapi message=InputBox("What do you want me to say?","Speak to Me") Set sapi=CreateObject("sapi.spvoice") sapi.Speak message 2.Now save the notepad file with the name speak.vbs at your desktop. 3.Now double click on speak.vbs type in the box whatever you want your computer to speak for you.


=====Windows XP SP3 to Include Some Vista Features=====

http://www.megaleecher.net/uploads/xp-vista-dekstop.jpg

Windows XP SP3 to Include Some Vista Features A Web site that leaked details of Windows XP Service Pack 3 over the weekend claimed that the update includes several new features, including some borrowed from Windows Vista. According to NeoSmart Technologies, Windows XP SP3 build 3205, which was released to beta testers, includes four new features among the 1000-plus individual hot fixes and patches that have been issued since XP2’s debut three years ago. Features backported from Vista, said NeoSmart, include Network Access Protection (NAP), an enterprise policy enforcement technology that inspects client PCs before they access a corporate network, then updates the machines if necessary or blocks them if they don’t meet specified security criteria. Other additions range from a kernel module containing several encryption algorithms that can be accessed by third-party developers, to a new Windows activation model that doesn’t require users to enter a product key. Microsoft had previously announced SP3 support for NAP, which is part of Windows Vista and will be included in the not-yet-finalized Windows Server 2008. Windows XP SP3, which Microsoft has said will be released early in 2008, will be one more move by the developer to extend the lifespan of the six-year-old operating system. Last month, for example, Microsoft gave Windows XP a five-month reprieve by pushing back the end of retail sales and sales of XP-powered PCs by large resellers to June 30, 2008. And last week, Microsoft debuted a new “get-legal” program that lets companies purchase large quantities of Windows XP Professional licenses through their usual resellers. Microsoft was not immediately available for comment on the leak, or the new features touted by NeoSmart.


=====How to Remove a Trojan Win32 Agent Malware===== 

data:image/jpg;base64,/9j/4AAQSkZJRgABAQAAAQABAAD/2wCEAAkGBhIQERQUDxQVFBQPFBUPFBUWFRQUEBYRFBEVFBQQFBQXHTIgFxkjGRQUHy8hIycpLCwwFR4xNTIqNSYrLCkBCQoKDgwOGg8PGi0fHCAtLCwqLzQsLC01LzUpLCwqKTU1NSwtLywpNSo0Mi01LC8sKS8pLyksLCksNCwpLykpKf/AABEIAGgAaAMBIgACEQEDEQH/xAAcAAABBAMBAAAAAAAAAAAAAAAAAQIFBgMEBwj/xAA7EAABAwEEBgYHBwUAAAAAAAABAAIDEQQSITEFBhNRcZEiMkGBscEHQlJhobLwIzNDYnLC0RQkgpLx/8QAGwEAAgMBAQEAAAAAAAAAAAAAAAMBAgQFBgf/xAArEQACAQMDAQcEAwAAAAAAAAAAAQIDBBEhMUESExQiUYGR8AVCocEVYbH/2gAMAwEAAhEDEQA/AOIueanE5ntTbx3lD8zxQpAL53lKHHeeaalAUAPvHeeaW8d55pEIyAXjvPNF47zzSFCMgLeO880XjvPNIhGQFvHeeaLx3nmlawnIErPFo6R3VY49yMkqLeyNe8d55oUnFq1aHepTiaeKFXrXmNVtVe0H7ES/M8SkSvzPFIrCQTgkor3oPREQijLmNLi0OJIqcce1WisjKdNzeCksjc7qgngCVuRaEndlG7vFPFdCa0DIAcBRBCHHBshaJ7spMWqcx611vE18FuQ6m+3JyH8q07Mokhc00cCDnQgg034pbya4WlFb6+pBR6qQjO87votuLQcDcox31KkA1LRJbZthb0o7RRgZZmNya0cAFmBT2wuOQJpuBIWNKa8zVDC0Qt5CaShUwNOYvzPEoSvGJ4lIugeIMsbLxAHrEDmV02OK6AB6oA5Ci59q/BftEQ/MHdzel5Lo5am01obLZbsYApzQsDXwWhpaC5rb4NBeHROR4t+KhgFIaH0n/TvLrt4ObdIrTtBBy93xTISSlrsabinOdJqG+jXoyVkh2bLPZhg6V7ZJKZ4uBA5/Ith2i4pZ7QZ7z2wsZiXG8OgXE4U5KEOlnG0bcgEh14NJwAAo1tfcsh0+/wC2o1v9z1s6gXbtG47t6l1Yc/MIzdzuPt0bWrzy5Jv2RI6Hs8Ewne2BobHG0MaekbwY8l2OZOHIJr7CG6OZVnTke31ftDWUkCtK4gDmonRumJbPe2RHTpUEVFRkR78Si16bnlaGyPJAdfGABvVJBqBXtKR20OnXfD/JpdjXdXwvwZi93nRfOS5wzh7msidNZzc6MZiAYB7XSaRXsz7FQNKwFk0jS4OLXuBcAACa4mgwHBb79YrUW3TM+mWFAf8AYCvxUYWJFxXjUSSNX06wqW0pSk1h+v5wn/prlqRZzGkWLJ2ek5c44nifFNqlccTxKSq6J4csWpMF60F3sMJ7zRvmVeKKsag2foyv3lrB3Ak+StoYmx0R1LWHgRiupQxZbitmrFl2MbZHDpWmRsbfcyp6XCoJ5IjHreB9zW7vT6sZfCKe2MnACp3dqCzernofR13SUo7Gh7xwfdp85WGyautlbJaJ9oWvkfdZE29I7pkXssq15JUqb4+YCN/BPxLTEX6y4KlcRs1c7RqYxs8DWueY7TXMASNusvEZbqdm9N0roGxWd2zdJIX7Rl78kRoXE0biabvaGCzypy5NdO+pSaUcvKzt6FQ2BpWhpWlaYVzpXek2S6XrjYrOyzMYSWlgJhaBQFwDQb1BuPuzVBEKRWj0PBqsbjvNPrxjU0jEhb39OhZuo6KicVccTxPikqhwxPE+KRdg+fHR9SLLSyg+25zvjdHgrEIk7VjQzhZYQGn7tpOGFSLx8VLHRhGas5YR6ShRxBIiBHjjl20zp7lYpNbXBzBA0MjYGtLSA5xAOIB7MKBaDrCmGxFJ7Zx2G1LKnWa7RZx+yci1nhE75QyTpxNjA6NbzXE1OOVLvJJofT0Ys7YZjLGWGrXwmjiKk0PM/BQosae2zJMriQR+lUMY1458tibg09ELUyT7bZRB9L7zI685t2oBPRHeorS04mtEkja3XuqK4GlABXkmCBZGwrPOs5aGylaUqUupb4x+yway6Ss1qiaWudtGdVtCB0i29ewpkN6q4s63GwrK2zpNSo5vLLUKcLaHRFvH9miLOhSbbKhLwN7dHmt+Z4lAWV4FTiM+wE9vJISPr+Au4eDMtn0jLH93I9n6Xub4FSMGuVuZ1bVP3yOcOTlFCOqNkoLKclsyxxekbSDfx736o4nftW7D6VLaOsIXcYyPlcFTjH9FFwqHFMdG5rR2k/cvsXpbmHXs8R4Okb4krdi9LjPXsp/xlHmxc2unckr7lR0oPgar+4X3HWIfSvZT1oZm8Nm79wW7F6TbAczM3jHX5XFcbD0okS3bwGL6lX5Z3CH0gaOP49P1Ryj9q34NctHuytUXeS35guAiRG1Kr3aJf+SqcpHo6DT1kd1bTAeEsf8AKF5x2pQq91XmH8g/IxubiePmgNQhbXucsysd9f8AVmB+sUIQSgp9YeSCzfwSIUkibP68010P15oQoAaYk0xlCFAYG3UUQhBUcyMnJIhCC/Sf/9k=data:image/jpg;base64,/9j/4AAQSkZJRgABAQAAAQABAAD/2wCEAAkGBhQPERESDxEQDxQSFBYQFRYVEBAYDxcaHxUVFRgXFhUXHCYqGRkjGRQVIS8gIycpLCwtFR41NTAqOCY3LCkBCQoKDgwOGg8PGS8kHyItLSosNDU1LDQqNS4sLCwpKSwqLCwsLCoqNSwsLDApLyk0LCk1KzQpLCksLC0sKSwsKf/AABEIAKAAoAMBIgACEQEDEQH/xAAcAAACAwEBAQEAAAAAAAAAAAAABgECBwUEAwj/xAA+EAABBAACBwUGAwcEAwEAAAABAAIDEQQFBhITITFRkQdBYXGxFRYiUoHRQqGiFCMyYoKSwVNys+E1k6Mk/8QAGwEAAgMBAQEAAAAAAAAAAAAAAAECAwQFBgf/xAA0EQABAwIDBAYKAwEAAAAAAAABAAIDBBEFEiETFjFSFEFRYXGhBhUiM0KBkbHR8CMy8XL/2gAMAwEAAhEDEQA/ANsiiGqNw4DuHJW2Q5DoERfwjyHorppKmyHIdAjZDkOgV0JJqmyHIdAjZDkOgV0IQqbIch0CNkOQ6BXQhCpshyHQI2Q5DoFdCEKmyHIdAodG0cQ3oF9FzM6xeq3VHE8fJUVM4gjMjupTjZncGhevax82fpRtY+bP0pRMxUbU815beU8i6Pq/vTftY+bP0o2sfNn6UobU80bU80bynkR6v7037WPmz9KNrHzZ+lKG1PNG1PNG8p5Eer+9N+1j5s/Sjax82fpShtTzUiU80bynkR6v705xfwjyHorpWbmz6HxO4D0U+1n/ADOW0+kVPfgVQKJ9k0ISv7Wf8zuqPaz/AJndUt4qfsKfQXpoQlf2s/5nI9rP+Z3VG8VP2FHQnpoQlf2s/wCZ3VHtZ/zORvFT9hR0J6aEJX9rP+Z3VHtZ/wAzuqN4qfsKOhPTM91Ak929KmY4nXcSryZm9wILibXjK4uLYu2raGR6DrWumpjGbuVaRStSKXnFuuq0ilakUhF1WkUrUikIuq0gBWpACLoupaNw8h6IpWA3DyHoikO4lQB0VaRStSKUbp3VaRStSCmASbBK6rSKXnw+ZxySPia4GSMBzm8HAHcD4ixS9VKckb4nZXixSa8OFwq0ilakUq7qV1WkUrUikXRdVpFK1L5zzBjS53ACzzVkcbpHBrBclIuDRcq1IpfLBY1k8bZInB7HcHDhxo/UEEfRfelFwLSQeIQHX1CrSKVqRSjdO6rSmlNKQEXRdS0bh5D0RSlo3DyHoppDuJVYOirSKVqRSindVpc7SLF7HDTSD8DQ79QXTpcTTeBz8vxYjGs7ZFwHeaIcfyBWqjNqiP8A6H3Vcn9D4JL7Pc1OKzbHyHd+5DR5B7P82tNpYp2P5sxuYyteaOIiLWctYFr9XzIaVttLrekTSKwk9YCopD/Gqlc3NtIIcK3Wmkjj5a7gL8guPpxpeMDG8ii5oAA5vPAHwA3ri6LdnTcUwYzN9fETTAPbG5zgxjTvaCB3kb64Dcr6WhpaanFTWa5uAUXyve/JH1Los7ToA74qdH3vjdravi5nGvJNuDxbJmNkie2RjxbXNNtI8EgaX9ksJidLlzTBMwF2zDnGOQd7RfB3LuPBLHY9pQ6DFfskhOzxBOqDfwygbiOWsBR+nJSnoaSrp3VFHoW8QkyWSN+WTrW2Uk/tDz44RgoXrwy9fhA9U5Us17ZcS0QtH4g0s+ri010bf1WLAQTWtt1X+ysqj/GV2+yo3leH85P+RybUr9l+GdHleFDwWkh7wDxovcWn6hNVLDiJBq5Lcx+6th92PBVpFK1IpYVbdVpSAppACEXUtG4eQ9FNKWjcPIeimknHUqsHRVpFK1IpK6d1WkUrUikXQvzxp3kDsrzAmC42ucMTh3D8PxXq/wBLgR05rb9FdIGY/CxTsLbcAJGg72P4OaR3b948CF49OdDGZpAIy4RyRnXifVgEii1w+U0OgSNoeybKJnQYxhjJPwPG+J7fB34h+YXs27PGKZrC4CVnn/vkufrA8m2hXk7RcOXY3DMkPwy4nv4Vrtbv+hWzELDe1TN9pPBIyvg+IcrsH1C2LR3PY8fh48REbDx8Q72u/Ew+IP5UoekML2wwm2jRY+Nh+E6VwzOXQCwPP8ndhMx28YprccSCO796HD1IW+SPDQSeAWeaVYqPDQmWVrXESibVPAuDtYA/WkvRqJ52rraEW+adW4aBaFM7VDie61jOZj23mseGYdaGIl8rhwIB+Mg9GDzXlOl2ZZy44fCNd8X8bm00AHm7gxv5laPoBoI3Kon6zhLNLW0cBTQBwY2+6yTff9FaGx4NA+7gZXDTu/ePeo3M7hpoE0RxhoDWgNAAaAOAAFADwpWpWpFLxhN9Sugq0ilakUldF1WkUrUgBF0XUtG4eQ9FNKW8B5D0RSHHUqAOiikUppCjdO6ilVzgOJXwzDMGQMc+RwaGjWJJoAcysvxGkWNzyV8GV/uYG7pJ3W3d5919zRvPgu/h+EbdhnndkjHX2rNJPlOVupTpn2nmFwdiWZod8o+KToOCRc57UG4oGOMtLD3PY2/MXwPiEzZB2VYPBAS4r/8AZKCHF8l7O/5Y+/f81r46f5s2PDSENbEyqprGCR5O4CwNw8AvR0BpXvDaSG7R8R0+nEnyWWTPa73fJYznmY7R2rxrvXr0T0xmy55MRdqurXaHUHeYO4lW0L0OlzWcxsIYxvxyyEWGNvuHe49w+y3zItCMHgmBsMEZNUZHta+V3iXOG7yFBa8UxWmpRs5BmJ6vyoRROfqNFns3bewtoYeQnxcyvySHpVpc/HuGsNRo36tr9BZ1obhMawsnw8Z5PaxrJW+Ic0ethYNp5oLJlUoF7WGSzFJVE1xa8dzhY8+PlHC8Wpqn+Jjch7PwnLC5up1Vcp7Q8ZhI2xYeRkUY7mww2fEnV+I+JWg6NdrRdTcQRPzIDWTj+ng78ko6G9pUmBDI8VE3FYfg22M2zB/I8jeP5T1Cf8ToTludxHE4MiF7jvfGKp1XUsPAHyrnaoxDozHEVUFmn4xr9dAR5px5vgd8k45VnkOLFwSNeRxbwkb/ALmHePPguhS/PekeQY3J3xulcXN1v3OIjJ3Eb6J4g/ynj4rU+z7tBZmTNnLqsxTBbmjc2Qf6kf8Alvd5LzlfhAij6RTOzs+375LXHPc5XaFONIpSil55abqKQAppSi6LoaNw8h6KaUtG4eQ9FNJO4lVg6KtLhaWaXQ5bG105oyEhgrjVWfpY6rv0uNpNojh8yY1mKY52oS5jmuLXtJ3GjyNDceS1UboWzNM4u3rUX5svs8VlbsVitJsRsYtaDCRkOlefV3Nx7mfUrXclySLBQsgw7NRjP7nHvc497jzV8myWHBwtgwzBHG3uHEnvc497jzKnN8d+zwSy/I0uHnwH5ldLEMSfiEjYYxZlwGjyuf3RVRxiMXPFKHaDpe3Bt5lvwtb8z/8Ar7rL+0TatGEbiXyGeSL9plYTUcesTs2NbzDRZJs27wTDkWD9r5wBJ8UODbtXA/iII3eNvIvwC5/blEfaLTzw8Z/NwXsaZ7KaaOhj6mknx/dfosbruBeVo3ZNkgw2Wwuqn4i53nv3/CweQaB1KcqXH0KkDsuwJbw/Z4x0bR/MFdql8+r5HSVMjnccx+66MejRZVpLXaLkgxeXYlhFujYZ4+YcwF27zbrD6pnpebM62M18NlJf9jlXSSOjnY9vEEJv1aQV+atDshbmEk2H+LamB8mHo7jI2nahHeHNDh50u32S6THA47YyktixJELwdwa+6Y48t5LT/uXo7NMHqZ3G1u7UZIT/AOo36qvbHo0MLjdvHuZimmah3PBAf1JDv6ivpFRIyaodRScHsuPHX/fkua0EDOOorcszyuPExPhnYJI3jVc0+o5EHge5fn/TLQ/EZJiGSQvfstfWgmG5zTx1XEcHDoR0W16A5y7G5fhp5f4y0scfmLSWa31q/qV18yyyPExPhnYJI3inNPDz8CO4jgvGUVfJhk7on6tuQ4eVx+6rY9glbccUr9nGnQzWF20AZPDqiUD+B13T28ro2O4pvpcbRjQ3DZY17cKxw2hBc5zi55q6F8hZ3eK7dLm1z4HzudTizTwVseYN9riq0pAU0gBY1O6lo3DyHoFNKWjcPIeimkncSoA6KtIpWpFJIuq0uBp9LqZbjHHujv8AU1MNLnaQ5MMbhZ8MXFgmYWawF0eINd+8DctFI9rJ2OdwBBP1UX6tIWSdhsuvjsa75ob/APqxdjt0yIvhgxbRexJhk/2O3tP0cCP611+zXs2flL55Jpo5XSNETQwO1Q3W1rJcBvNDd3J0zDLmYiKSGZofHI0sc094Poe8HwXoKvE42YoKmI3aLA+FrFUNjJjylZx2J6VNlw5wLyNpBb4/5oybNeLXE/R3gtOpfnLSfRHE5FimytLzGH60M7Nx8A4/hfXEHcfJaLov2wxTMDcUWNfwLgQy/EsduB8jS0YnhDql3SqP2mu1I70o5cvsuWkUuDppmzcNhZXPNDVN+XLzJ3fVc7Mu1LBQtLts1x7mtIc8/Rv+Ss7xGIxek+IEcLTBhWOt7nXqjxeR/E+uDB/2oYbgz4X9JrPZa3XVOSa4ytXZ7EsndJJiswkFa5MMfmSHSEeAGq36lR28ytH7IDxcyYD+6JajlGUx4SGOCAascTQ1vPxJ5kmyfNKvaX2fOzZsBilZFJCXD4w7ULXat72g0QWju71VBikcmKdIkNm6geFrBBjIjyhX7Iv/ABOG85f+RycaXJ0R0e9n4OHDa+0MYNuqgSXFxodw3rsUuHXytlqZHsOhcSPqr2aNAKrSKVqRSxqV1WlICmkAIRdS0bh5D0U0hg3DyHoppJ3EqAOiikUppFJXTuopFKaRSLouopFKaRSLouvjisIyVjo5WNkY4U5rgC0jxBSTmXYvl0xJYyXDk/6cp1ejwU+Uilqp62en908hRLWu4hIOXdimXxEF7ZsRXdJL8P1DAE7YLAxwMbHCxkTGimta0Bo+gXopFJ1FdUVHvXkpNa1vAKKRSmkUsl1O6ikUppFIui6ikUppFIui6ikAKaUgIui65DdJIwBudwHceXkp95Y+Tuh+yb4h8I8h6K1L6AfRWG/9ysQnKTveWPk7ofsj3lj5O6H7JxpFJbqw85Rtyk73lj5O6H7I95Y+Tuh+ycaRSN1Yeco25Sd7yx8ndD9ke8sfJ3Q/ZONIpG6sPOUbcpO95Y+Tuh+yPeWPk7ofsnGkUjdWHnKNuUne8sfJ3Q/ZHvLHyd0P2TjSKRurDzlG3KTveWPk7ofsj3lj5O6H7JxpFI3Vh5yjblJ3vLHyd0P2R7yx8ndD9k40ikbqw85Rtyk73lj5O6H7I95Y+Tuh+ycaRSN1Yeco25Sd7yx8ndD9kDSWPk7ofsnGkUjdWHnKNuV//9k=data:image/jpg;base64,/9j/4AAQSkZJRgABAQAAAQABAAD/2wBDAAkGBwgHBgkIBwgKCgkLDRYPDQwMDRsUFRAWIB0iIiAdHx8kKDQsJCYxJx8fLT0tMTU3Ojo6Iys/RD84QzQ5Ojf/2wBDAQoKCg0MDRoPDxo3JR8lNzc3Nzc3Nzc3Nzc3Nzc3Nzc3Nzc3Nzc3Nzc3Nzc3Nzc3Nzc3Nzc3Nzc3Nzc3Nzc3Nzf/wAARCACnAN8DASIAAhEBAxEB/8QAGwABAAIDAQEAAAAAAAAAAAAAAAEFAgMGBAf/xAA3EAACAQMBBQUGBQQDAQAAAAAAAQIDBBEhBRJBUWEGEyIxkxQWMlRxoVKBkbHhQmLB0SMk8HL/xAAZAQEAAwEBAAAAAAAAAAAAAAAAAQIDBAX/xAAiEQEAAgICAgMBAQEAAAAAAAAAAQIDERIxBFETFCFBYSL/2gAMAwEAAhEDEQA/APuIAAAAAAAAAAAAAAAAAAAAAAAAAAAAAAAAAAAAAAAAAAAAAAAAAAEEgCPIr7vatC3m4aykvNI27Rula20pZW89I9TlpycpNzllvidODBF/23SlradZZ3lK7i3Teq80+B6TktnXTtLqMm3uPSS6HVxkpJNPKayimbF8dv8AE1ncMgAYrAAAAAAAAAAAAAAAAAAAAAAAAAAAENpJt+SGSt21d9xQdOL8c+vki1aza0RCJnSo2td+03LUdYR0RTLfupylGrOnRi92HdvDk+LzyNl3OXhpQf8AyVNE/wAK4v7/AKmynCNOChFYUUkl0PWpWK11DHspSk04zbco6N8X1Oj2Ded7T7ib8UFmPVHNVfC4zXDR9Uei2rzoVoVab1jqupXNj511/U1nUu04kmq3qxuKMKsH4ZLKNp5PXbYAAAAAAAAAAAAAAAAAAAAAAAAAIYGFWoqdOUpPCisnI7QuvaLidWTxFJ4zwRa9oL3C9npy185HMXL72pG3XwaTq4893gvzf2R3+Lj4xylnaf3SbROpKVxPzn8C5R4fr5nrUW3hJv6IwznRfkdhbUKdrQjTpJJY1eNWzXLm+KOv2URG3IZXkzVTfdydJ+XnH6ci47RUoU7ilUglHvU95Li1jUqKmWk0/EtVkvjyRevKETGl72fvNyo7ab8Mm3D6nQZOEo1H4JwbUlqnxTOx2bdq8tYVV8XlJcmcXlYtTyhek/x6wAcq4AAAAAAAAAAAAAAAAAAAAAHnvbiNrQnVlwWi6m9vBzG3r116/cwfgp8ebNcOPnbStp0q7y50q16v1xz6Gi1hKEJSqa1ZvM/rjH7aGtv2i6WNadF6/wB0/wCP3Z6eB6kRr8ZJUt2Sk+DT++Ttc5eV5PU4iWqa5rB2FpU7y1oVM/FTi/scfmR1K9O1N2mnm4tYclJ/siqxlYPZ2gnvbVjFf0Ul93/B4cs28aNY4Rbtjnu6uj0m/wBGWuxL32W53ZPFOpo88HzKupFSg09OvIU5b0XvaSWkl1Nb1i0TWVYnTv08klXsO89ptlCUs1Kaw+q5lmn1PItXjOpbRO0gAhIAAAAAAAAAAAAAAAAAYzaim28JageLa94rS1bT8ctIo4u6ryhF48VScsRX93P6f6LHa147y6k84hHSOSnof9is6z0pxzGl9OL/ADPTwY+Ff9ljady30aSpUowWuPN83xf6mzJjnAN0JZ1Gxp72y6H9qcf0Zy2TotgSzs5p/wBNV/fBy+XH/G1qdqbas9/a9w+SjH7fyecXE9++upPjVf8AhEZNsUapEIt2yNU33c4zS8L0kZ5IlhxafkaIevZ11KzuoVVrHykuh2lOSnBSi04tZTR89pPDcZPWP3R0/Zu9UoO0m9Y6w+nI4/Kx7jnC9Z/i+QIRJwtAAAAAAAAAAAAAAAAEMp+0N8qFHuKb8c/i6ItLitGhRlUm8RisnD7Qu3XrVLirPdisv6I6PGx87bnqFbS8V3PeSoQeJVfif4Yrzf8Aj8zfFKMVGKxFLCXJHntYylvVqicZ1OH4Y8F/7i2eg9FkkZMcjJIyyXWwam5aXClwmn9v4KPJa0uzlO4pwlfTUG1lQ3MtLqc/kceGplavappy3t6X4pN/czyei/sJbPqRp6Sg14JRWn8Hlya0mJrGkT2yyDEF0MaiaxNauLzjn0N1tXlSqQr0pYcXlM15zozXTahNw1w9V05kTG0w+g2dxC6t4VqfwyWccuhvOV7O33c3DtqkvDUfhfKX8nUroeVlp8dtNazuEgAzSAAAAAAAAAAAQyTybTu42drOo/PGEupMRNp1Ape0t9l+ywlovjw+PI5es++rKivghiVTryX+Tfd3DxVrzzKSTkzTb03ThiT3pt5nLm//AGh6uOsUrFYZT23oZMRk0VZZGTHIyBkpKLUsZw08czraN3Su4d7CalF9dUcgap0ITlmW8v8A5k4/t5nPnxfJrS1Z0ttvXtOtd0relNTdJOU2nlLKxg8GTTRpQox3acVBclxNmS+LHwrqSZ2yyMmORk1VZGNRNrw/EvJ8mMgCaNTO7OLaec5XBnb7IvVe2kZtrvIvdmupwmqqZ4S88cGWexL/ANjvY77fdT8Mv9nP5GPlXfpas6l24IjjCx5EnmtQAAAAAAAAAAQcv2tqVFXoU22qbi2nzZ1D1R4Nr2FHaNq7evHMW8p5w4vmnwZpitwtEomNw4aSTbT/ADQWEsZLl9j7deV9f+uzF9kaK8r299dnbHkR6U4yqM9RnqWr7JUfnL312R7p0fnb312T9iPRxlV5XMZXMs32To/OXvrsj3TpfOXvrsfYj0cVblcxnqWXupS+cvfXY906Xzl767Hzx6OKtyMll7p0fnL312PdOj85e+ux88ejircrmMrmWXunS+cvfXZPunR+dvfXY+xHo4yrM9RktF2So/O3vrsyXZGjxvb1fSux9iPRxlU5EpKEXJ6Jav6Fuux9DjfX3rs3W/ZK0pVoVZ1rmvuPe3K1ZuL/ACKz5Ean8OC+2HKpLZNo66aqOmm8+fT7HuMKSxCOM4xxeWZnBM7loAAgAAAAAAAADGUcmQA1OKSbwRuI2tGMNFhk7kYd2uRHdo3YGBuRodNDu0b90bpPJGmju0QqafA34Ikm+I5Saau6Q7tG1dVgy3RyNNHdod2jfujA5DT3aJ3FyNuBgjaWtQXIy3UmSkZDYhLCwSAQAAAAAAAAAAAAAAYy5gASvIkAAAAAAAYAAAAACGABKAAAAAAAAAAH/9k=


How to Remove a Trojan Win32 Agent Malware Trojan Win32 Agent is a Type of Malware which is capable of installing software/programs on your computer without your permission. The program installed will launch whenever your computer is restarted/rebooted. These types of Trojans may even steal your Data files according to the wish of the hacker. While you can get rid of a Trojan Win32 Agent manually, the removal process can be difficult for some, and in some cases may still not be enough to properly remove the infection. For most computer users, antivirus software will be the best method for both removing the trojan and protecting the computer from future infections. How to Remove it? * Download and install an antivirus program such as kaspersky Antivirus, Norton Antivirus, Avast Antivirus or any highly rated antivirus software. If the trojan has rendered you unable to connect to the Internet, download the software in Windows “Safe Mode with Networking.” If necessary, use another computer to download the software to a CD or USB drive, and then install the program from the device. * Run the antivirus program. Update the software’s definitions; usually antivirus software, after installation, is not completely up-to-date. This means it might not be able to detect the Trojan Win32 Agent until it is updated. An update utility program is included with most antivirus software. Launch this utility upon running the software. * After the definitions have updated, use the software to designate which files and folders you want scanned. It’s usually a good idea to scan the entire hard disk. * Press the scan button and allow the software to search for the Trojan Win32 Agent. This may take anywhere from several minutes to a few hours. * Follow the antivirus software’s instructions on how to remove the trojan. Some antivirus software will automatically remove the infection; other such software will allow you to either quarantine or delete the infection. * Schedule your antivirus software to scan your drive at least once a week. Configure the software so that it will scan every file you download to make sure none are infected. Most virus removal software will do this automatically.
Read more »

MOBILE TRICK

0 comments


==NOKIA MOBILE SECRET CODES== 

To check the phone's Software Version
Dial : *#0000#

To enter the service menu type: *#92702689#
Clock Stopping: *#746025625##06#
Display the IMEI (GSM standard): *#0000#
Display the firmware version and date: *#bta0#
Display the Bluetooth MAC address ( models with build-in Bluetooth radio, activate first to show address)
Dial : *#mac0wlan#
Display the WLAN MAC address (models with build-in Wi-fi radio)
Dial : *#opr0logo#
Clear the operator logo (3310 and 3330 only)
Dial : *#pca0#
Activate the GPRS PCCCH support (early GPRS models)
Dial : *#pcd0#
Deactivate the GPRS PCCCH support (early GPRS models)
Dial : *#res0wallet#
Reset the mobile wallet (models with mobile wallet)
Dial : *#res0#
Soft-format the memory (Symbian models only)
Dial : *#rst0#
Reset to factory defaults, confirmation required (DCT4 or newer)
Dial : *#sim0clock#
Display the SIM clock status (DCT3 only)
Dial : *#ssn0#
Display the manufacturing serial number
(mid-range and premium, non-Symbian models, and those devired from them)
 Dial : *#war0anty# (92702689)
Display the manufacturing and repair info(no exit on DCT3)
Dial : *efr0#
Enable EFR encoding (pre-2003 models)
Dial : #efr0#
Disable EFR encoding (pre-2003 models)
Dial : *hra0#
Enable HR encoding (pre-2003 models)
Dial : #hra0#
Disable HR encoding (pre-2003 models)
Dial : #pw+1234567890+n#
Display the SIM lock status:
(pre-2003 models)
n = 1: provider lock
n = 2: network lock
n = 3: country lock
n = 4: SIM lock
[NOTE: Use it Carefully]
http://funnylogo.info/logo/harrypotter/Fire/NEMISH%27S%20TRICKS%20ZONE.aspx


http://t0.gstatic.com/images?q=tbn:c8YszzdZlU38HM:http://www.wallpaperdojo.com/images/electronics/Nokia_N90.jpg&t=1http://0.tqn.com/d/cellphones/1/0/a/_/4/nokia-n72-g.jpg


HOME


.:: NOKIA ::. Nokia Universal Codes Code Description :
These Nokia codes will work on most Nokia Mobile Phones
(1) *3370# Activate Enhanced Full Rate Codec (EFR) - Your phone uses the best sound quality but talktime is reduced my approx. 5%
(2)#3370# Deactivate Enhanced Full Rate Codec (EFR) OR *3370# ( Favourite )
(3)*#4720# Activate Half Rate Codec - Your phone uses a lower quality sound but you should gain approx 30% more Talk Time.
(4)*#4720# Deactivate Half Rate Codec.
(5)*#0000# Displays your phones software version, 1st Line : Software Version, 2nd Line : Software Release Date, 3rd Line : Compression Type. ( Favourite )
(6)*#9999# Phones software version if *#0000# does not work.
(7)*#06# For checking the International Mobile Equipment Identity (IMEI Number). ( Favourite )
(8)#pw+1234567890+1# Provider Lock Status. (use the "*" button to obtain the "p,w"
and "+" symbols).
(9)#pw+1234567890+2# Network Lock Status. (use the "*" button to obtain the "p,w"
and "+" symbols).
(10)#pw+1234567890+3# Country Lock Status. (use the "*" button to obtain the "p,w"
and "+" symbols).
(11)#pw+1234567890+4# SIM Card Lock Status. (use the "*" button to obtain the "p,w"
and "+" symbols).
(12)*#147# (vodafone) this lets you know who called you last.
(13)*#1471# Last call (Only vodofone).
(14)*#21# Allows you to check the number that "All Calls" are diverted to
(15)*#2640# Displays security code in use.
(16)*#30# Lets you see the private number.
(17)*#43# Allows you to check the "Call Waiting" status of your phone.
(18)*#61# Allows you to check the number that "On No Reply" calls are diverted to.
(19)*#62# Allows you to check the number that "Divert If Unreachable (no service)" calls
are diverted to.
(20)*#67# Allows you to check the number that "On Busy Calls" are diverted to.
(21)*#67705646# Removes operator logo on 3310 & 3330.
(22)*#73# Reset phone timers and game scores.
(23)*#746025625# Displays the SIM Clock status, if your phone supports this power saving feature "SIM Clock Stop Allowed", it means you will get the best standby time possible.
(24) *#7760# Manufactures code.
(25)*#7780# Restore factory settings.
(26)*#8110# Software version for the nokia 8110.
(27)*#92702689# Displays - 1.Serial Number, 2.Date Made, 3.Purchase Date, 4.Date of last repair (0000 for no repairs), 5.Transfer User Data. To exit this mode you need to switch your phone off then on again. ( Favourite )
(28)*#94870345123456789# Deactivate the PWM-Mem.
(29)**21*number# Turn on "All Calls" diverting to the phone number entered.
(30)**61*number# Turn on "No Reply" diverting to the phone number entered.
(31)**67*number# Turn on "On Busy" diverting to the phone number entered.
(32)12345 This is the default security code.
press and hold # Lets you switch between lines NOKIA 5110/5120/5130/5190 IMEI number: * # 0 6 #
Software version: * # 0 0 0 0 #
Simlock info: * # 9 2 7 0 2 6 8 9 #
Enhanced Full Rate: * 3 3 7 0 # [ # 3 3 7 0 # off]
Half Rate: * 4 7 2 0 #
Provider lock status: #pw+1234567890+1
Network lock status #pw+1234567890+2
Provider lock status: #pw+1234567890+3
SimCard lock status: #pw+1234567890+4 NOKIA 6110/6120/6130/6150/6190 IMEI number: * # 0 6 #
Software version: * # 0 0 0 0 #
Simlock info: * # 9 2 7 0 2 6 8 9 #
Enhanced Full Rate: * 3 3 7 0 # [ # 3 3 7 0 # off]
Half Rate: * 4 7 2 0 # NOKIA 3110 IMEI number: * # 0 6 #
Software version: * # 0 0 0 0 # or * # 9 9 9 9 # or * # 3 1 1 0 #
Simlock info: * # 9 2 7 0 2 6 8 9 # NOKIA 3330 *#06#
This will show your warranty details *#92702689#
*3370#
Basically increases the quality of calling sound, but decreases battery length.
#3370#
Deactivates the above
*#0000#
Shows your software version
*#746025625#This shows if your phone will allow sim clock stoppage
*4370#
Half Rate Codec activation. It will automatically restart
#4370#
Half Rate Codec deactivation. It will automatically restart
Restore Factory Settings
To do this simply use this code *#7780#
Manufacturer Info
Date of Manufacturing *#3283#
*3001#12345# (TDMA phones only) This will put your phone into programming mode, and you'll be presented with the programming menu.
2) Select "NAM1"
3) Select "PSID/RSID"
4) Select "P/RSID 1"
Note: Any of the P/RSIDs will work
5) Select "System Type" and set it to Private
6) Select "PSID/RSID" and set it to 1
7) Select "Connected System ID"
Note: Enter your System ID for Cantel, which is 16401 or 16423. If you don't know yours,
ask your local dealer for it.
8) Select "Alpha Tag"
9) Enter a new tag, then press OK
10) Select "Operator Code (SOC)" and set it to 2050
11) Select "Country Code" and set it to 302 for Canada, and 310 for the US.
12) Power down the phone and power it back on again
ISDN Code
To check the ISDN number on your Nokia use this code *#92772689# .:: Ericsson ::. Ericson T65 *#05# Fake Insert puk screen Press no to exit Ericsson T20
Ericsson T20
MENU tecnichal Info
[type] >*<<*<* Displays :
1] Info service
1] Info SW
2] Info hardware
3] SIMlock
4]setup
2] Service setup
1] Contrast 3]Service Test
1] Display
2]Leds
3]Keyboard
4] ringer
5] Vibration
6]Headset
7] Microphone
8]Clock
4] Names List
MENU info
[Type] >*<<**<
Network and Subnetwork : NCK and NSCK Ericsson T28 >*<<*<* menu Tecnichal info
SW vers. and name list
>*<<**< menu Personal Info
Network and Subnetwork : NCK and NSCK
< and > are the right and left menu's keys Ericsson T18s/T10/A1018s >*<<*<* software
CXC125065 Internal product code
PRG
970715 1515 Software version and SW rev.
<* CLR <><**
< and > are the right and left menu's keys
!!!><**
Control /Enable SIM Lock!!! Ericsson R310 Technical Info : >*<<*<*
Options :
1) service Info
info Software
Simlock
Configuration 2) Service Test
Display
Led/Illumination
Keyboard
ringer
Vibration
Headset
Microphone
Clock
3)Text's name List
Info personal : >*<<**< SIM Locking ( 8 digits' code ) ( it could harm your phone )
1) Network
2) Subnetwork
3) SP
4) Corporate
.:: Siemens ::. Siemens C25 IMEI number: * # 0 6 #
Software version: put off sim card and enter: : * # 0 6 # and press LONG KEY
Bonus screen: in phone booke: + 1 2 0 2 2 2 4 3 1 2 1 .:: Bosch ::. IMEI Number: * # 0 6 #
Dafault Language: * # 0 0 0 0 #
Net Monitor: * # 3 2 6 2 2 5 5 * 8 3 7 8 # .::Alcatel ::. IMEI number: * # 0 6 #
Software version: * # 0 6 #
Net Monitor: 0 0 0 0 0 0 * .:: Samsung ::. Samsung SGH600/2100DB IMEI number: * # 0 6 #
Software version: * # 9 9 9 9 # albo * # 0 8 3 7 #
Net Monitor: * # 0 3 2 4 #
Chaning LCD contrast: * # 0 5 2 3 #
Memory info: * # 0 3 7 7 # albo * # 0 2 4 6 #
Reset pamieci (SIMLOCK`a removing!!!): *2767*3855#
Reset pamieci CUSTOM: *2767*2878#
Battery state: * # 9 9 9 8 * 2 2 8 #
Alarm beeper: *#9998*289#
Vibra test: *#9998*842# .:: Dancall ::. IMEI number: * # 0 6 #
Software version: * # 9 9 9 9 # .:: Philips ::. *#3333*# Displays the blocking list.
*#7489*# Displays the security code.
*#06# Displays the IMEI number.
*#8377*# Displays the SW info. .:: Panasonic ::. Panasonic gd90 gd93 *#9999# SW - Type the code on switch on , during network seek
-Vers. SW and production code
Enable ringing and vibration contemporarily
Enable vibration with # then increase volume with "tone menu " Panasonic gd70 *#9999# SW - Type the code on switch on , during network seek
-Vers. SW and production code
Enable ringing and vibration contemporarily
Enable vibration with # then increase volume with "tone menu " .:: Acer ::. Acer V 750 *#400# Display Adc/ Set Cal-Value -
*#402# Set LCD Contrast
*#403# Display Errors Info
*#300# Display Info Hw & Sw
*#301# Menu Test
*#302# Menu Acoustics
*#303# (Settings saved) Set English language?
*#307# Menu Engineering
*#311# Reset Phone Code - [ Also reset Security Codes ! ]
*#330# (Execute not success) [ unknown ]
*#331# (Service deactivated) [ unknown ]
*#332# (Service unavailable)[ unknown ]
*#333# (Execute not success)[ unknown ]
*#351# (Service unavailable) [ unknown ]
*#360# (Invalid input)[ unknown ]
*#361# (Invalid input) [ unknown ]
*#362# (Invalid input) [ unknown ]
*#363# (Invalid input) [ unknown ] .:: Genie ::. Genie DB *#06# IMEI.
*#2254*# Near Cell Mode. For every received BTS will be displayed :
Current channel and 2 channel levels
*#06# IMEI
*#2558# time of network connection ( D/H/M )
*#2562# Fores reconnection to network
!!!*#7489# Dispalys and modify phones' security code!!!
!!!*#3377# SIM lock information !!!
*#7378# SIM card Informations : supported phase name and tipe
*#7693# Enable/disable "Sleep Mode"
*#8463# State of "Sleep Mode"
*#2255# Debug Call Mode enable/disable
*#3333*# Displays the blocking list.
*#7489*# Displays the security code
*#06# Displays the IMEI number
*#8377*# Displays the SW info. .:: NEC ::. NEC db2000 *#2820# software vers.
IMEI *#06#
Reset *73738# (send?)
SP Lock info:
* # 3210 # (send?)
Network barring info : *#8140# (send?)
( it could harm your phone )
SIM lock it could harm your phone )
*#4960 # (send?) -Inquiry * 4960 * password * password # (send?) lock
#4960* password # (send?) unlock
[password] [8 digits]
Net Lock
*#7320# (send?) -Inquiry * 7320 * password * password # (send?) lock
#7320* password # (send?) unlock
[password] [ 8 digits]
Net Lock 2:
*#2220# (invio) - Inquiry * 2220 * password * password # (send?) lock
#2220* password # (invio?)unlock
[password] [8 digits]
Unlock subnetwork
*#1110# (send?) - inquiry * 1110 * password * password # (send?) lock
#1110* password # (send?) unlock
[password] [nĂ¯¿½ 8 cifre]
( it could harm your phone ) .:: Trium ::. Trium Geo/Geo @ - Astral - Cosmo -Aria Enter the menu and type *
A new menu will be displayed :
Application : SW version and battery's voltage
Trium Galaxy
Push * and type 5806: Production date and SW version .:: Telit ::. Telit GM 810 MONITOR - technical menu - : type ++++ and push OK.
Adiacent cells list : # and *
Now if you push OK the phone displays battery ' s voltage and temperature .:: Sagem ::. Sagem MC959/940 Select commands' menu and push *
Displays a new menu' :
Appli : software vers. and battery's voltage
Eprom
Sim Lock
Test LCD: display test , green/red and vibration Sagem MC920 Select commands' menu and push *
Displays 5 new menus : 1 APPLI
VERSION ( SW)
BATTERY (voltage )
2 PROM (IMEI)
3!!! SIM LOCK (10 digits code requested ) !!!
4- NETWORK (returns : OPTION NOT AVAILABLE)
5- TEST LCD
SYMBOL 1 (LCD)
SYMBOL 2 (test2 LCD)
BLACK (all icons and carachters displayed )
FOR PHOTO (welcome message and time )
VIBRATOR (vibration test )
.:: Sony ::. Sony CMD Z5/J5 Vers. SW :
Without SIM , switch on phone and type l *#7353273# .:: Eprom ::.
!!! Sim Lock [10 digits code ] ( it could harm your phone )
NETWORK : OPTION NOT AVAILABLE
Test LCD: display test of the green/red leds and vibration
Push * and type 4329 :enables/disables network monitor 1 (the same of MT35)
Push * and type 621342 :enables/disables network monitor 2
Push * and type 5807 : Serial Number Software Vers.
Push * and type 936505: IMEI -- Software Vers.
TPush * and type 547 : Test serial Data Cable DISPLAYS :"Testmode"
Push * and type 362628: ISMI BLOCK (UNKNOWN)
Push * and type 476989: NS BLOCK (UNKNOWN)
Push * and type 482896:CP BLOCK (UNKNOWN)
Push * and type 787090: ? BLOCK (UNKNOWN)
Push * and type 787292 : block current network
!!! Push * and type 967678: SP LOCK!!!
Push * and type 850696:Warm Start ( ENABLE/DISABLE)
Push * and type 3926 : Swicth off phone
Push * and type 5806: Production date and SW version .:: Motorola ::. Motorola V3688 IMEI *#06#
Enhanced Full Rate Codec EFR
Enable EFR : [][][] 119 [] 1 [] OK.
disable EFR : [][][] 119 [] 0 [] OK .:: Tips and Tricks ::. Send an E-mail from your GSM From your telephone you can send an email to whichever E-mail customer of the Internet network. The e-mail will be sent to the maximum of within an hour from the reception.
The sended message will contain in luminosity the telephone number of the sender. In order for sending e-mail, send an SMS with this syntax (always separated by spaces):
EMA name@domain text-of-your-email Example: in order to send an email to john@doe.com, do the following:
EMA john@doe.com text-of-your-email if your phone cant print @ replace it with a !
EMA johon!doe.com text-of-your-email And then send this message to the folloving number: +39 338 8641732
Free SMS Center numbers
From your telephone you can send SMS messages of 160 char. max. to another GSM phone Your message will be sent through an SMS Center (usually the one that gave your provider)
You pay a little fee depending of your provider, BUT YOU WILL HAVE TO PAY something In order for sending SMS without paying anything, you got to change your SMS Center number with these one
+491722270300 or +358405202999 or +352021100003 Codes (that they dont tell you in the manual) To check the IMEI (International Mobile Equipment Identity) type: *#06# Information you get from the IMEI:
XXXXXX XX XXXXXX X
TAC FAC SNR SP
TAC = Type Approval Code (first 2 digits = country code). FAC = Final Assembly Code (For Nokia phonfiltered=10).
SNR = Serial Number. SP = Spare (always SP=0).
To check the phone's software (firmware revision information) type: *#0000# ( or for some phones outher then Nokia 61XX you can try *#model nummber# ex. for 8110 *#8110#) Information you can get from the phone's software version:
V 3.14
28-11-97
NSE-3
1st line: Software version.
2nd line: The date of the software release.
3nd line: Phone type, .
Some versions and dates: V 3.14 28/11/97
V4.33 11/03/98 V 4.73 22/04/98
V 5.24 14/9/98 Pin-Out Diagram for the 6110 1 - VIN CHARGER INPUT VOLTAGE 8.4V 0.8A
2 - CHRG CTRL CHARGER CONTROL PWM 32Khz
3 - XMIC MIC INPUT 60mV - 1V
4 - SGND SIGNAL GROUND
5 - XEAR EAR OUTPUT 80mV - 1V
6 - MBUS 9600 B/S
7 - FBUS_RX 9.6 - 230.4 KB/S
8 - FBUS_TX 9.6 - 230.4 KB/S
9 - L_GND CHARGER / LOGIC GND Revealing Headphone and Car-Kit Menus Think about this: If you do these tricks the new menus can not be erased after the procedure. But it's not dangerous or harmful for your phone To enable the headset-function, you have to short-circuit the "3" and "4". After a short time there is "Headset" on the display Now, menu 3-6 is now enabled!
To enable the carkit-function you have to short-circuit the "4" and "5". After a short time, "Car" is shown on the display and the menu 3-7 is enabled!! This Trick is for you how want to hear more then your supposed to ! If you short-circuit the left and the right contact with the middle contact ("3", "6" and "9") the Nokia Software hangs! The profile "Headset" will be activated. Before you do this, just active the "auto call receive" function in the headphone profile and set the ringing volume to "mute" Now you can use your phone for checking out what people are talking about in a room. Place the phone somewhere stratidic and call your phone! The phone receives the call without ringing and you can listen to what people are talking about! .....gr8... Serial numbers on your 6110 For more info type: *#92702689#
The first screen gives you the serial and IMEI number.
Then there is the Date of Manufacture: ex. Made 1297
Then there is the Purchasing Date: ex. Purchasing Date 0298
Then there is the last Repair Date: ex. Repaired: 0000 Note: you must turn off the phone to exit after this test, because of the last function, "transfer user data" which doesn't work as "standard"....You can use this mode only to transfer all Calender, Profile and Callers Group Information to another phone (eg. if you are replacing phone or configuring phones for use within your company or when a particular phone doesn't works correctly )
Activating and deactivating EFR and HFR, on your 6110 *3370# to activate Enhanced Full Rate - Makes calls sound better, but decreases the battery life by about 5%. #3370# to deactivate Enhanced Full Rate
*4720# to activate Half Rate Mode - Drops call quality, but increases battery life by about 30%. #4720# to deactivate Half Rate Mode
Read more »

USES OF WINDOWS KEY OR SUPER KEY

0 comments

USES OF WINDOWS KEY OF YOUR KEYBOARD
**Must See**

The Windows key - also known as the Super key, Meta key, Windows logo key, the WinKey, the Start key, MOD4, or rarely the Flag key. The Windows logo key, located in the bottom row of most computer keyboards is a little- used treasure. Don''t ignore it. It is the shortcut anchor for the following commands:

WindowsDisplay the Start menu 
Windows + D: Minimize or restore all windows 
Windows + E: Display Windows Explorer 
Windows + F: Display Search for files 
Windows + Ctrl + F: Display Search for computer 
Windows + F1: Display Help and Support Center 
Windows + R: Display Run dialog box 
Windows + break: Display System Properties dialog box 
Windows + shift + M: Undo minimize all windows 
Windows + L: Lock the workstation 
Windows + U: Open Utility Manager 
Windows + Q: Quick switching of users (Powertoys only) 
Windows + Q: Hold Windows Key, then tap Q to scroll through the different users on your PC

Feeling Amazed??? Even I went through this moment after knowing the usefulness of windows key....
Read more »

FIND THE MOBILE NUMBER OF YOUR SIM CARD

0 comments

https://blogger.googleusercontent.com/img/b/R29vZ2xl/AVvXsEjADjHcNy_RMW9Bt5WaNo8g9iRrdZ_JORLqaZRheMTHlBMuuBQa3O-5Z0V_PeEEPJzjMmBPuFbPUTimGxqtAwSydm_ZT9SnVZlIXRHGpAoJWrAPE-3PkACANfoSaxfWZGvdqY4iWXgXQQM/s1600/Number+portability.jpg

IDEA- *789#
AIRCEL- *888#
DOCOMO- *1*#
RELIANCE- *1#
BSNL- 24365
LOOP MOBILE- *222#
VIDEOCON- *1#
AIRTEL- SMS IM TO 57070
MUMBAI (DOCOMO)- *124#
Read more »

How to make Gmail accounts without SMS verification(all new tricks)

0 comments
----How to make Gmail accounts without SMS verification----

Wanna know how to make accounts with google without any verification or whatever Well, let me tell you how I do it every day without deleting cookies or anything. You can do it with proxy or without proxy. For me it works everytime. So, let's start:
1. Go to gmail.com and hit the sing up page
2. For first and last name I use imdb.com to search names from movies or names of the actors, I combine them, I use a unique name that I believe is not used by anyone. If google will detect that name in their database they will require SMS verification. So go with a unique name, not the popular ones like John Doe or whatever. If you will use the same name on other account they will require SMS verification so stick with a unique one. Everything need to be unique.
3. For login name I don't use numbers and is unique, I will not use that username again. I only use dot in username. If you will create another username similar to that, again, they will detect and they will ask for SMS verification on both accounts.
4. Password. I use a unique password for every account. If you will make a few accounts with the same password they will detect them and they will ask you for SMS verification, so try a unique password. I don't use number in passwords. And I don't use similar passwords.
5. Security Question. Write your own question. Don't use it in other account.
6. I don't use recovery email.
7. The rest it is at your choice. I think that at this part you understand that your whole profile must be unique. If you use the same name, password, similar username with other accounts they will always request SMS verification. Be unique and you will not even need a proxy. I do it every day and I can't even remeber when they requested me SMS verification. I know this from my experience.


----10 things you didn't know about Windows XP----
You've read the reviews and digested the key feature enhancements and operational changes. Now it's time to delve a bit deeper and uncover some of Windows XP's secrets.
1. It boasts how long it can stay up. Whereas previous versions of Windows were coy about how long they went between boots, XP is positively proud of its stamina. Go to the Command Prompt in the Accessories menu from the All Programs start button option, and then type 'systeminfo'. The computer will produce a lot of useful info, including the uptime. If you want to keep these, type 'systeminfo > info.txt'. This creates a file called info.txt you can look at later with Notepad. (Professional Edition only).
2. You can delete files immediately, without having them move to the Recycle Bin first. Go to the Start menu, select Run... and type 'gpedit.msc'; then select User Configuration, Administrative Templates, Windows Components, Windows Explorer and find the Do not move deleted files to the Recycle Bin setting. Set it. Poking around in gpedit will reveal a great many interface and system options, but take care -- some may stop your computer behaving as you wish. (Professional Edition only).
3. You can lock your XP workstation with two clicks of the mouse. Create a new shortcut on your desktop using a right mouse click, and enter 'rundll32.exe user32.dll,LockWorkStation' in the location field. Give the shortcut a name you like. That's it -- just double click on it and your computer will be locked. And if that's not easy enough, Windows key + L will do the same.
4. XP hides some system software you might want to remove, such as Windows Messenger, but you can tickle it and make it disgorge everything. Using Notepad or Edit, edit the text file /windows/inf/ sysoc.inf, search for the word 'hide' and remove it. You can then go to the Add or Remove Programs in the Control Panel, select Add/ Remove Windows Components and there will be your prey, exposed and vulnerable.
5. For those skilled in the art of DOS batch files, XP has a number of interesting new commands. These include 'eventcreate' and 'eventtriggers' for creating and watching system events, 'typeperf' for monitoring performance of various subsystems, and 'schtasks' for handling scheduled tasks. As usual, typing the command name followed by /? will give a list of options -- they're all far too baroque to go into here.
6. XP has IP version 6 support -- the next generation of IP. Unfortunately this is more than your ISP has, so you can only experiment with this on your LAN. Type 'ipv6 install' into Run... (it's OK, it won't ruin your existing network setup) and then 'ipv6 /?' at the command line to find out more. If you don't know what IPv6 is, don't worry and don't bother.
7. You can at last get rid of tasks on the computer from the command line by using 'taskkill /pid' and the task number, or just 'tskill' and the process number. Find that out by typing 'tasklist', which will also tell you a lot about what's going on in your system.
8. XP will treat Zip files like folders, which is nice if you've got a fast machine. On slower machines, you can make XP leave zip files well alone by typing 'regsvr32 / u zipfldr.dll' at the command line. If you change your mind later, you can put things back as they were by typing 'regsvr32 zipfldr.dll'.
9. XP has ClearType -- Microsoft's anti-aliasing font display technology -- but doesn't have it enabled by default. It's well worth trying, especially if you were there for DOS and all those years of staring at a screen have given you the eyes of an astigmatic bat. To enable ClearType, right click on the desktop, select Properties, Appearance, Effects, select ClearType from the second drop-down menu and enable the selection. Expect best results on laptop displays. If you want to use ClearType on the Welcome login screen as well, set the registry entry HKEY_USERS/.DEFAULT/ Control Panel/Desktop/ FontSmoothingType to 2.
10. You can use Remote Assistance to help a friend who's using network address translation (NAT) on a home network, but not automatically. Get your pal to email you a Remote Assistance invitation and edit the file. Under the RCTICKET attribute will be a NAT IP address, like 192.168.1.10. Replace this with your chum's real IP address -- they can find this out by going to www.whatismyip.com -- and get them to make sure that they've got port 3389 open on their firewall and forwarded to the errant computer.

----For a Safer, faster XP CloseUnwanted Services----
To disable unneeded startup services for a safer, faster XP, use the "Services" Admin Tool (Control Panel > Administrative Tools > Services). If you are a single user of a non-networked machine, you can disable the following items, with no ill effect. Alerter Clipbook Computer Browser Fast User Switching Human Interface Access Devices Indexing Service (Slows the hard drive down) Messenger Net Logon (unnecessary unless networked on a Domain) Netmeeting Remote Desktop Sharing (disabled for extra security) Remote Desktop Help Session Manager (disabled for extra security) Remote Procedure Call Locator Remote Registry (disabled for extra security) Routing & Remote Access (disabled for extra security) Server SSDP Discovery Service (this is for the utterly pointless "Universal P'n'P", & leaves TCP Port 5000 wide open) TCP/IP NetBIOS Helper Telnet (disabled for extra security) Universal Plug and Play Device Host Upload Manager Windows Time Wireless Zero Configuration (for wireless networks) Workstation


----How to make your Desktop IconsTransparent----
Go to ontrol Panel > System, > Advanced > Performance area > Settings button Visual Effects tab "Use drop shadows for icon labels on the Desktop"

----Speed up your browsing of Windows 2000 & XP machines----
Here's a great tip to speed up your browsing of Windows XP machines. Its actually a fix to a bug installed as default in Windows 2000 that scans shared files for Scheduled Tasks. And it turns out that you can experience a delay as long as 30 seconds when you try to view shared files across a network because Windows 2000 is using the extra time to search the remote computer for any Scheduled Tasks. Note that though the fix is originally intended for only those affected, Windows 2000 users will experience that the actual browsing speed of both the Internet & Windows Explorers improve significantly after applying it since it doesn't search for Scheduled Tasks anymore. Here's how : Open up the Registry and go to : HKEY_LOCAL_MACHINE/ Software/Microsoft/Windows/ Current Version/Explorer/ RemoteComputer/NameSpace Under that branch, select the key : {D6277990-4C6A-11CF-8D87-00AA0060F5BF} and delete it. This is key that instructs Windows to search for Scheduled Tasks. If you like you may want to export the exact branch so that you can restore the key if necessary. This fix is so effective that it doesn't require a reboot and you can almost immediately determine yourself how much it speeds up your browsing processes.


----Set up and Use Internet ConnectionSharing----
With Internet Connection Sharing (ICS) in Windows XP, you can connect one computer to the Internet, then share the Internet service with several computers on your home or small office network. The Network Setup Wizard in Windows XP Professional will automatically provide all of the network settings you need to share one Internet connection with all the computers in your network. Each computer can use programs such as Internet Explorer and Outlook Express as if they were directly connected to the Internet. You should not use this feature in an existing network with Windows 2000 Server domain controllers, DNS servers, gateways, DHCP servers, or systems configured for static IP addresses.
Enabling ICS The ICS host computer needs two network connections. The local area network connection, automatically created by installing a network adapter, connects to the computers on your home or small office network. The other connection, using a 56k modem, ISDN, DSL, or cable modem, connects the home or small office network to the Internet. You need to ensure that ICS is enabled on the connection that has the Internet connection. By doing this, the shared connection can connect your home or small office network to the Internet, and users outside your network are not at risk of receiving inappropriate addresses from your network. When you enable ICS, the local area network connection to the home or small office network is given a new static IP address and configuration. Consequently, TCP/IP connections established between any home or small office computer and the ICS host computer at the time of enabling ICS are lost and need to be reestablished. For example, if Internet Explorer is connecting to a Web site when Internet Connection Sharing is enabled, refresh the browser to reestablish the connection. You must configure client machines on your home or small office network so TCP/ IP on the local area connection obtains an IP address automatically. Home or small office network users must also configure Internet options for Internet Connection Sharing. To enable Internet Connection Sharing (ICS) Discovery and Control on Windows 98, Windows 98 Second Edition, and Windows Millennium Edition computers, run the Network Setup Wizard from the CD or floppy disk on these computers. For ICS Discovery and Control to work on Windows 98, Windows 98 Second Edition, and Windows Millennium Edition computers, Internet Explorer version 5.0 or later must be installed.
To enable Internet Connection Sharing on a network connection You must be logged on to your computer with an owner account in order to complete this procedure. Open Network Connections. (Click Start, click Control Panel, and then double–click Network Connections.) Click the dial–up, local area network, PPPoE, or VPN connection you want to share, and then, under Network Tasks, click Change settings of this connection. On the Advanced tab, select the Allow other network users to connect through this computer's Internet connection check box. If you want this connection to dial automatically when another computer on your home or small office network attempts to access external resources, select the Establish a dial –up connection whenever a computer on my network attempts to access the Internet check box. If you want other network users to enable or disable the shared Internet connection, select the Allow other network users to control or disable the shared Internet connection check box. Under Internet Connection Sharing, in Home networking connection, select any adapter that connects the computer sharing its Internet connection to the other computers on your network. The Home networking connection is only present when two or more network adapters are installed on the computer. To configure Internet options on your client computers for Internet Connection Sharing Open Internet Explorer. Click Start, point to All Programs, and then click Internet Explorer.) On the Tools menu, click Internet Options. On the Connections tab, click Never dial a connection, and then click LAN Settings. In Automatic configuration, clear the Automatically detect settings and Use automatic configuration script check boxes. In Proxy Server, clear the Use a proxy server check box.


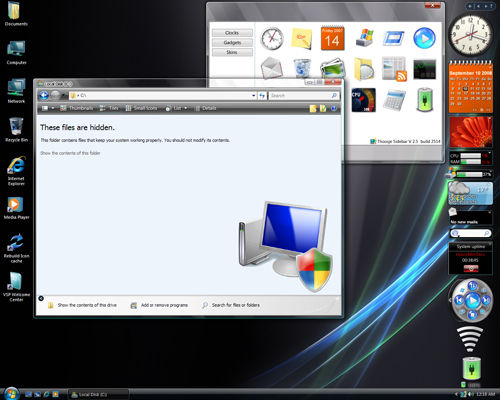
----Search For Hidden Or System FilesIn Windows XP----
The Search companion in Windows XP searches for hidden and system files differently than in earlier versions of Windows. This guide describes how to search for hidden or system files in Windows XP. Search for Hidden or System Files By default, the Search companion does not search for hidden or system files. Because of this, you may be unable to find files, even though they exist on the drive. To search for hidden or system files in Windows XP: Click Start, click Search, click All files and folders, and then click More advanced options. Click to select the Search system folders and Search hidden files and folders check boxes. NOTE: You do not need to configure your computer to show hidden files in the Folder Options dialog box in Windows Explorer to find files with either the hidden or system attributes, but you need to configure your computer not to hide protected operating system files to find files with both the hidden and system attributes. Search Companion shares the Hide protected operating system files option (which hides files with both the system and hidden attributes) with the Folder Options dialog box Windows Explorer.

----How to Rename the Recycle Bin----
To change the name of the Recycle Bin desktop icon, open Regedit and go to: HKEY_CLASSES_ROOT/CLSID/ {645FF040-5081-101B-9F08-00AA002F954E} and change the name "Recycle Bin" to whatever you want (don't type any quotes).


----Slow Shutdown----
Some people have noticed that they are experiencing a really slow shutdown after installing Windows XP Home or Professional. Although this can be caused a number of ways, the most clear cut one so far is happening on systems with an NVidia card installed with the latest set of drivers. A service called NVIDIA Driver Helper Service is loading up on start up and for whatever reason doesn't shut itself down properly. The service isn't needed and can also increase the amount of memory available to your system. Here is how to disable it. 1: Go into your Control Panel 2: Select Administrative Tools and then click on Services 3: Right click on the file "NVIDIA Driver Helper Service" and then select STOP. 4: To stop this loading up every time you boot up your PC Right click it again and select properties - then where the option "Startup Type" is shown - make sure it is set at Manual


----XP Game Compatibility----
You want to know if all your favorite games are still going to run under Windows XP. Remember what happened when we tried to run games on our Windows 2000 machines? Sometimes we were a little disappointed. Windows 2000 was made more for corporate applications than "Quake," but true techno-geeks know they don't have to sacrifice death matches for a robust business environment -- at least not anymore. Windows XP has shown an impressive track record of game compatibility. We ran a number of standard games, such as "Tiger Woods Golf," "NHL 2001," "Max Payne," and "Unreal" on our Windows XP Professional machine. Some of these games were specifically slated for Windows 95 and 98, and were shown not to work in Windows 2000. The installation in XP was as smooth as silk. The games ran quickly and beautifully -- not a problem in sight (except for my bad chip shot -- Tiger was hanging his head in shame). Some less-sophisticated programs may not run as smoothly, and we found that some older applications, such as the Atari 2600 Classic Game Collection, did not appreciate the Windows XP environment. In this case you can use the Application Compatibility Wizard, found in the accessories menu. XP includes integrated compatibility layers to mimic older versions of Windows, so if your program does not work in Windows XP, the compatibility wizard will walk you through the process of getting even your favorite DOS games up and running. In this case, we ran the Atari Classic Game Collection in the Windows 95 environment, at 256 colors and 640x480 screen resolution. Then we set XP to always run our Atari application in this environment, and everything was smooth sailing after that. One final tip about compatibility: Don't run the compatibility wizard if your program appears to be running well in the normal environment, as the wizard will give you an error message. In general, XP has great program compatibility, so you can upgrade your operating system without giving up all your old favorites.


----Password recovery disk----
Take preventive measures against losing user-level passwords. It doesn't matter if you never again remember a Windows user password. Thanks to XP's Forgotten Password Wizard, your conscience will be free and clear -- should your mind happen to accidentally misplace your user password. I highly suggest you create a password recovery disk the minute you create your user account. Why? In order to create a password recovery disk you're going to need your password. Write it down the minute you create your user account and then proceed to creating your very own password recovery disk. Here's how to launch the Forgotten Password Wizard: Single-click Start menu, Control Panel, and User Accounts. Click your user account name. Under Related Tasks on the left, click "Prevent forgotten password" to launch the wizard. Now that you've launched the wizard, let it walk you through creating the recovery disk. Make sure the disk you use is formatted and in the drive. After it's finished creating the disk, label it and stash it away for an emergency. If you happen to forget your password, all you need to do is click your user icon at the logon screen. Even though you don't have your password, go ahead and click the green arrow just like you would to finish logging on to your computer. This will launch a little yellow dialog box directing you to use your password recovery disk.


----Classic Look Make XP look just likeolder versions of Windows----
If you're like me, you probably have grown way too close to the familiar Windows interface. That's OK. I don't adjust well to change either. After installing XP you may notice the revamped interface looks nothing like the old one. I was completely thrown back when I tried using it for the first time, but I suspect that over time the new interface will begin to grow on you as it has with me. Therefore, to ease your transition to the new OS, make a simple adjustment to XP to give it that classic look. Here's how to do it: Right-click your Desktop and select Properties. On the Desktop Display properties, click the Appearance tab. Under the Windows and buttons pull-down menu, select Windows Classic. Click Apply to see your new look. Click OK to close the Desktop Display properties.


----XP expires----
To reduce instances of "casual copying" (a nice name for software piracy), Microsoft has implemented a two-stage antipiracy scheme in its upcoming OS. The first stage is the installation and registration counter: this lets you install Windows XP only five times on the same system. (Note that you'll be able to install the final version of XP on only one machine, as opposed to the current beta, which can be installed on five machines for testing purposes.) The second stage creates a profile of the system to prevent you from reinstalling or registering the OS on different PCs. To make this scheme work, you must activate your copy of Windows--over the Internet or by calling for an activation code--within 30 days of installation. Activation differs from a classic registration process in that no personal information is requested by or sent to Microsoft, just a record that a specific copy of Windows XP is installed on your specific PC. If you fail to activate your copy of the OS within 30 days, your login will fail. (Since XP is based on Windows NT-like privilege levels, you can't use your computer until you log on.) Microsoft says the scheme should not prevent you from reinstalling your copy of XP on your PC as many times as you need to, as long as it's the same PC or close to it, allowing for some hardware changes. It's the "some" that has most folks worried. In theory, you might have to reactivate your OS if you upgrade significantly or swap out a lot of components because XP might think it's running on a new PC. So far, Microsoft isn't saying what system information the OS uses to determine the "same PC or close to it" status. That means we don't know to what degree you can upgrade your hardware before you cross the invisible line. We also don't know how much, if any, personally identifiable data Microsoft is gathering from your PC. Microsoft says you can, of course, change at least one and possibly several hardware components--RAM, video or sound cards, CPUs, motherboards, and so on-- without having to reactivate your OS. But if you try to reinstall your copy of Windows XP on what Microsoft calls a "different or significantly upgraded or changed PC" (again, the company declined to specify how different), the activation will most likely be rejected, requiring you to call Microsoft to explain and get a new (free) activation code. Microsoft plans to set up a new call center for U.S.-based customers to expedite activation issues. Many non- U.S. customers will likely have to go through the existing, shared Microsoft technical support lines they currently use. Microsoft says it expects only 2 percent of the total installed base of Windows XP to have to reactivate the OS. Whether the anti-piracy initiative will present problems for consumers or result in fewer upgrades to XP remains to be seen. Remember, the final release is at least a few months off

----Make Unname Folder----
Create a folder - go to rename...
press "alt+160" and u get a folder who haven't name
Read more »

How To Remove Error Deleting File or Folder-tricks

How To Remove “Error Deleting File or Folder” It is a very common and annoying message that the file or folder you are trying to d...


About Us

Blog Archive

© 2010 copy tricks Design by Dzignine
In Collaboration with Edde SandsPingLebanese Girls